|

Wind Vane
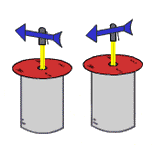
A wind vane is a tool for measuring wind direction. Knowing the direction
of the wind helps meteorologists determine in which direction a storm
or weather system will travel.
Build Your Own Weather Tool!
Use the materials and follow the directions below.
 Materials Materials
• Cardboard
• Clay
• Compass
• Empty coffee can or soup can
• Masking tape
• Pen cap that fits loosely over pencil end
• Sand or gravel
• Scissors
• Unsharpened pencil
Directions
- Cut an arrow, approximately 5" long, out of the cardboard.
- Cut a circle, slightly larger than the circumference of the can,
out of the cardboard and mark the directions North (N), Northeast (NE),
East (E), Southeast (SE), South (S), Southwest (SW), West (W), and Northwest
(NW) on it. Poke a hole in the middle that will be large enough for
the pencil to fit through.
- Push the pencil through the hole, eraser-side first. Stick the eraser
into a small ball of clay and place it in the bottom of the empty can.
Put sand or gravel into the can to stabilize it.
- Tape the pen cap to one side of the arrow. Set the arrow on top of
the pencil by placing the pen cap over the unsharpened pencil end. Make
sure that the arrow is level and that it can spin freely.
Experiment!
- Take the wind vane outside and place it in an open area. Use a compass
to make sure the N on your direction disk is pointing north.
- When the wind blows, observe which direction the arrow points. The
arrow will point in the direction the wind is blowing from. So, if the
arrow points north, the wind is blowing from the north.
- Record this data on your Weather
Data Sheet (PDF).
View and print using Adobe Acrobat Reader® software, version 4.0
or higher. Get
Adobe Reader for free.
|


 Materials